Cart is empty
DIY Weekly Menu Project
Category: Blogs
Posted: 07-16-2015 06:02 PM
Views: 3476
Synopsis:
Posted: 07-16-2015 06:02 PM
Views: 3476
Synopsis:
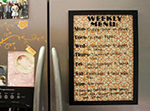
Create a stylish, reusable weekly menu for your kitchen in just a few minutes!
|
"What's for dinner?!" Sound familiar? Whether it's your family complaining, or your exasperated cries when dinner time rolls around, you know it all too well. Menu planning is the number one way to save not only money and time at the grocery store, but also to save your sanity! Just check the board, and everyone will know what's for dinner. You can make your own dry erase menu board for your kitchen. It takes no time at all, and is especially easy using our Weekly Menu Decal.
*Frame - The one I used here was 11 x 17" *Weekly Menu Decal - I used the smallest size (12 x 11.5") *Pretty fabric or paper for the background *Scissors *Expo Marker- for writing on it!
Step 1: Cut your fabric or paper to size. I used fabric for mine. Take the back out of your frame and lay it on top of the fabric to get an estimate of the size you will need. Step 2: Put your fabric on top of the frame back and reinsert the back into the frame, securing the tabs. Step 3: Cut apart your decal if necessary and lay on top of the frame glass. I arranged mine a little differently to fit my frame. Once you are happy with your layout, you can apply the decals directly on the glass. Simply peel off the backing, rub the decal down onto the glass, and then slowly peel back the transfer paper on top.
Step 3: Decide where you want to hang your snazzy new menu planner! I attached velcro strips to the back of my frame and my fridge. That way i can remove it if I want to use it at the kitchen table while I'm menu planning, or if I want to change out the fabric for a different look. Now you and your family can always tell what's for dinner. If only grocery shopping were this easy!
|
Comments on DIY Weekly Menu Project
-
 Best Selling Decals (66)
-
 Artistic Wall Decals (88)
-
 Words & Wall Quotes (74)
-
 Trending (33)
-
 Young at Heart (189)

Their online chat helped me connect with a person! I am someone who likes the human connection, so for me that made all the difference.
Every person I ""spoke to "" online at beautiful walls was helpful, courteous, friendly, and patient! No matter how many times I had a question or needed to make a change they quickly and kindly responded! I would (in fact I already have) recommend them to my friends and family!
Feb 3, 2016
-
Life is Not Measured Wall Decal
 $24.99
 -
Family Where Life Begins Wall Decal
 $19.99
 -
Home is Where Love Resides Wall Decal
 $44.99
 -
Chanel Wall Decal
 $19.99
 -
Ornate Baroque Wall Decal
 $39.99
 -
Bubble Dot Circles Wall Decal Pack
 $31.99
 -
Blossom Tree Large Wall Decal
 $79.99
 -
Basketball Lines Wall Decal
 $34.99
 -
Color Sample Card
 $3.00
$3.00 -
Custom Wall Decal
 $10.00